Tuesday, December 28, 2021

Secure FTP with TLS


Secure FTP with TLS 

It’s important to keep a few things in mind when using FTP – it is not encrypted by default meaning your credentials and files that you send are vulnerable to interception. To address this you should connect to vsftpd using FTPS (FTP over SSL/TLS).

Let’s begin by creating a new certificate with the openssl tool.

sudo openssl req -x509 -nodes -days 365 -newkey rsa:2048 -keyout /etc/ssl/private/vsftpd.pem -out /etc/ssl/private/vsftpd.pem

You will be asked to enter some details like country, etc. You don’t have to fill these in. You can just press ENTER for defaults.

Now that your private key has been created, there are a few changes we have to make to the vsftpd configuration file.

Open the config file in nano editor.

sudo nano /etc/vsftpd.conf

Find the following line: (Note: you can search in nano using CTRL + W)

etc/vsftpd.conf
ssl_enable=NO

Change it to:

etc/vsftpd.conf
ssl_enable=YES

Paste in the following beneath it.

etc/vsftpd.conf
rsa_cert_file=/etc/ssl/private/vsftpd.pem
rsa_private_key_file=/etc/ssl/private/vsftpd.pem
allow_anon_ssl=NO
force_local_data_ssl=YES
force_local_logins_ssl=YES
ssl_tlsv1=YES
ssl_sslv2=NO
ssl_sslv3=NO
require_ssl_reuse=NO
ssl_ciphers=HIGH
pasv_min_port=40000
pasv_max_port=50000

Save file and exit (press CTRL + X, press Y and then press ENTER).

Restart vsftpd.

sudo systemctl restart vsftpd

Testing TLS with FileZilla

We can now test TLS. We recommend FileZilla, which works on Windows, Mac and Linux.

Enter your server’s IP, your FTP username and password you created earlier, and click Quickconnect.

You may be presented with an Unknown Certificate warning. Click Always trust this certificate in future sessions and click OK.

If you are connected over TLS, it will tell you in the connection log. You will also see a padlock in the bottom right corner.

You’re all done!

Thursday, July 23, 2020

Install LAMP Server (Apache, MySQL, PHP) on CentOS 7

LAMP is a combination of operating system and open-source software stack. The acronym of LAMP is derived from first letters of Linux, Apache HTTP Server, MySQL/MariaDB database, and PHP/Perl/Python.

My test box hostname and IP address are localhost.local.com and 192.168.1.62 respectively.

Install Apache

Apache is an open-source multi-platform web server. It provides a full range of web server features including CGI, SSL and virtual domains.

The following commands should be run with root user privileges.

To install Apache, enter the following command in your terminal:

☒yum install httpd -y

Start the Apache service and make it to start automatically on every reboot:

☒systemctl start httpd

☒systemctl enable httpd

If you’re behind firewall or router, allow Apache server through your firewall/router in case you want to access it from the remote systems. To do that, enter the following commands from your Terminal:

☒firewall-cmd --permanent --add-service=http

☒systemctl restart firewalld

Test Apache

☐Open your web browser and navigate to http://localhost/ or http://server-ip-address/.

Below steps will show both MariaDB and MySQL server so either can be installed. 

Install MariaDB

MariaDB is a drop in replacement for MySQL. It is a robust, scalable and reliable SQL server that comes rich set of enhancements.

Now, start installing MariaDB as shown below:

yum install mariadb-server mariadb -y

Start MariaDB service and let it to start automatically on every reboot:

systemctl start mariadb

systemctl enable mariadb

Set MySQL root password

By default, MySQL root password is empty. So, to prevent unauthorized access to MySQL, let us set root user password. Enter the following command to setup mysql root user password:

mysql_secure_installation

/usr/bin/mysql_secure_installation: line 379: find_mysql_client: command not found


NOTE: RUNNING ALL PARTS OF THIS SCRIPT IS RECOMMENDED FOR ALL MariaDB

      SERVERS IN PRODUCTION USE!  PLEASE READ EACH STEP CAREFULLY!

In order to log into MariaDB to secure it, we'll need the current

password for the root user.  If you've just installed MariaDB, and

you haven't set the root password yet, the password will be blank,

so you should just press enter here.

Enter current password for root (enter for none):

OK, successfully used password, moving on...

Setting the root password ensures that nobody can log into the MariaDB

root user without the proper authorisation.

Set root password? [Y/n] y ## Enter Y and press Enter

New password:   ## Enter new password

Re-enter new password:  ## Enter password again

Password updated successfully!

Reloading privilege tables..

 ... Success!

By default, a MariaDB installation has an anonymous user, allowing anyone

to log into MariaDB without having to have a user account created for

them.  This is intended only for testing, and to make the installation

go a bit smoother.  You should remove them before moving into a

production environment.

Remove anonymous users? [Y/n] y  ## Enter Y and press Enter

 ... Success!

Normally, root should only be allowed to connect from 'localhost'.  This

ensures that someone cannot guess at the root password from the network.

Disallow root login remotely? [Y/n] y  ## Enter Y and press Enter

 ... Success!

By default, MariaDB comes with a database named 'test' that anyone can

access.  This is also intended only for testing, and should be removed

before moving into a production environment.

Remove test database and access to it? [Y/n] y  ## Enter Y and press Enter

 - Dropping test database...

 ... Success!

 - Removing privileges on test database...

 ... Success!

Reloading the privilege tables will ensure that all changes made so far

will take effect immediately.

Reload privilege tables now? [Y/n] y  ## Enter Y and press Enter

 ... Success!

Cleaning up...
 
All done!  If you've completed all of the above steps, your MariaDB

installation should now be secure.

Thanks for using MariaDB!

How to install MySQL Server 5.6 on CentOS 7

In CentOS 7/ RHEL 7 , now MariaDB is introduced as a defualt database. Still many Organisations/Company would like to continue with MySQL. Whereas System Admin who earlier worked on MySQL can easily work on MariaDB. MariaDB is a community-developed fork of the MySQL relational database management system.

Install MySQL Server 5.6 on CentOS 7 / RHEL 7
Follow the given below steps to install MySQL Server 5.6 .
You must be login with root user in system

Download the Yum Repo package of MySQL Server 5.6
Download the rpm package, which will create a yum repo file for MySQL Server installation.

☐yum install wget
☐wget http://repo.mysql.com/mysql-community-release-el7-5.noarch.rpm
 wget http://dev.mysql.com/get/mysql57-community-release-el7-7.noarch.rpm
Install mysql-community-release-el7-5.noarch.rpm package
Install this downloaded rpm package by using rpm command.

☐rpm -ivh mysql-community-release-el7-5.noarch.rpm
After the installation of this package. We will get two new yum repo related to MySQL

[root@localhost ~]#    ☒ls -1 /etc/yum.repos.d/mysql-community*
 /etc/yum.repos.d/mysql-community.repo
 /etc/yum.repos.d/mysql-community-source.repo
Installing MySQL Server
By using yum command, now we will install MySQL Server 5.6 . All dependencies will be installed itself.

☐yum install mysql-server
How to start/stop/restart MySQL Server
Now MySQL Server is installed on your system.

To start MySQL Service, run command

☐systemctl start mysqld
To stop MySQL Service, run command

☐systemctl stop mysqld
To restart MySQL Service, run command

☐systemctl restart mysqld
To get status of MySQL Service, run command

☐systemctl status mysqld
Reset MySQL root password
On fresh installation of MySQL Server. The MySQL root user password is blank.
For good security practice, we should reset the password MySQL root user.

On newly installed MySQL Server, we generally recommend to use the command script. You have to just follow the instructions.

root/pass4mysql

 If MySQl 5.7 and above

[root@mysql ~]#  grep 'temporary password' /var/log/mysqld.log
2016-02-17T11:14:36.244458Z 1 [Note] A temporary password is generated for root@localhost: *******


☐mysql_secure_installation
In another method,you can log into MySQL server database and reset the password in secure way.

☐mysql -u root
You will see mysql prompt like this mysql> . Use the below given commands to reset root’s password.

☐mysql> use mysql;
☐mysql> update user set password=PASSWORD("user4mysql") where user='root';
☐mysql> flush privileges;
☐mysql> quit

Install PHP

PHP (recursive acronym for PHP: Hypertext Preprocessor) is a widely used open-source general purpose scripting language that is especially suited for webhttp://images.intellitxt.com/ast/adTypes/icon1.png development and can be embedded into HTML.

Install PHP with following command:

☐yum install php php-mysql php-gd php-pear -y

Test PHP:

Create a sample “testphp.php” filehttp://images.intellitxt.com/ast/adTypes/icon1.png in Apache document root folder and append the lines as shown below:

☐vi /var/www/html/testphp.php

☐Add the following lines.

<?php

phpinfo();

?>

Restart httpd service:

☐systemctl restart httpd

Navigate to http://server-ip-address/testphp.php. It will display all the details about php such as version, build date and commands etc.

If you want to install all php modules, enter the command yum install php* -y and restart the httpd service. To verify for the modules, open web browserhttp://images.intellitxt.com/ast/adTypes/icon1.png and navigate to http://server-ip-address/testphp.php. You will then see all php modules.

Install phpMyAdmin (Optional)

phpMyAdmin is a free open-source web interface tool used to manage your MySQL databases. By default phpMyAdmin will not be not found in CentOS/RHEL/Scientific Linux official repositories. So let us install it from EPEL repository.

To add EPEL repository, just follow the link.

☐cat  /etc/centos-release

☐yum install http://dl.fedoraproject.org/pub/epel/7/x86_64/e/epel-release-7-5.noarch.rpm

  yum install https://dl.fedoraproject.org/pub/epel/epel-release-latest-7.noarch.rpm

Now, install phpMyAdmin:

☐yum install phpmyadmin -y

Configure phpMyAdmin

By default, phpMyAdmin can only be accessed from the localhost itself. To make it to accessible globally, do the following steps.

Edit the phpmyadmin.conf file:

☐vi /etc/httpd/conf.d/phpMyAdmin.conf

Find and comment the whole /<Directory> section and add the lines as shown below:

[...]

Alias /phpMyAdmin /usr/share/phpMyAdmin

Alias /phpmyadmin /usr/share/phpMyAdmin


## Comment the following Section ##


#<Directory /usr/share/phpMyAdmin/>

#   <IfModule mod_authz_core.c>

#     # Apache 2.4

#     <RequireAny>

#       Require ip 127.0.0.1

#       Require ip ::1

#     </RequireAny>

#   </IfModule>

#   <IfModule !mod_authz_core.c>

#     # Apache 2.2

#     Order Deny,Allow

#     Deny from All

#     Allow from 127.0.0.1

#     Allow from ::1

#   </IfModule>

#</Directory>


☒## Add the following lines:


<Directory /usr/share/phpMyAdmin/>

        Options none

        AllowOverride Limit

        Require all granted

</Directory>

[...]

Edit “config.inc.php” file and change from “cookie” to “http” to change the authentication in phpMyAdmin:

☐vi /etc/phpMyAdmin/config.inc.php

Change ‘cookie’ to ‘http’.

[...]

/* Authentication type */

$cfg['Servers'][$i]['auth_type']     = 'http';    // Authentication method (config, http or cookie based)?

[...]

Restart the Apache service:

systemctl restart httpd

Now you can access the phpmyadmin console by navigating to the URL http://nagios.gsp.com/phpmyadmin/ from your browser.

Enter your MySQL username and password which you have given in previous steps. In my case its “root” and “********”.

You will be redirected to PhpMyAdmin main web interface.

Now you will able to manage your MySQL databases from phpMyAdmin web interface.

That’s it. Your LAMP server is up and ready to use

Fail2ban

Introduction


Fail2ban is a software that helps in protecting the Linux servers from brute force hack attempts. A common example of this is with SSH, which will be the subject of brute force attacks that attempt to hack common account names.

Fail2ban works by dynamically altering the firewall rules to ban addresses that have unsuccessfully attempted to log in a certain number of times.

The basic idea behind fail2ban is to monitor the logs of common services to spot patterns in authentication failures.

Install steps


Install Fail2Ban on Ubuntu

apt-get update
# apt-get install fail2ban

Install Fail2ban on CentOS

While Fail2ban is not available in the official CentOS package repository, it is packaged for the EPEL project. EPEL, standing for Extra Packages for Enterprise Linux, can be installed with a release package that is available from CentOS.

# yum install epel-release 
# yum install fail2ban

Once the installation has finished, use systemctl or chkconfig to enable the fail2ban service

# systemctl enable fail2ban
                  or
# chkconfig fail2ban on

Fail2ban Service Settings


Fail2ban is configured through a variety of files located within /etc/fail2ban/ directory.

The fail2ban.conf file configures some basic operational settings like the way the daemon logs info, and the socket and pid file it will use. The main configuration, however takes place in the files jail.conf.

Note:- Fail2ban bans watches the service logs and creating rules that can automatically alter your iptables firewall configuration based on a predefined number of unsuccessful login attempts.

Config

Bantime for an IP:- 10 hours (36000 seconds in conf file)
Number of failed attempts:- 3 (after 3 failed attempts the IP is blocked)
Services Watched by Fail2ban:- ssh, vsftp, Apache

How To check IP in iptables

If one of our user is not able to access our Linux servers it is a possibility the user's IP has been blocked due to too many failed login attempts.

To check if the IP has been blocked use the below given command as root user.

# iptables -L -n --line-numbers (this will give the list of iptable rules, check and see if the IP is blocked)

Sample
Chain fail2ban-ssh (2 references)
num      target         prot opt source               destination
1    DROP       all  --  59.45.175.66         0.0.0.0/0
2    DROP       all  --  74.112.255.218       0.0.0.0/0
3    DROP       all  --  59.45.175.64         0.0.0.0/0
4    DROP       all  --  190.152.110.202      0.0.0.0/0
5    DROP       all  --  85.105.212.12        0.0.0.0/0
6    DROP       all  --  59.45.175.56         0.0.0.0/0
7    DROP       all  --  59.45.175.67         0.0.0.0/0
8    DROP       all  --  201.178.113.162      0.0.0.0/0
9    DROP       all  --  59.45.175.86         0.0.0.0/0
10  DROP       all  --  101.66.253.100       0.0.0.0/0
11  DROP       all  --  59.45.175.88         0.0.0.0/0
12  DROP       all  --  27.194.249.192       0.0.0.0/0
13  DROP       all  --  123.96.174.30        0.0.0.0/0
14  DROP       all  --  221.122.101.203      0.0.0.0/0


# iptables -L -n --line-numbers | grep our-IP (will show if the IP in question is blocked or has some other rule against it or not)
# iptables -D fail2ban-ssh num (say if the IP you want to unban/unblock is on number 5 in fail2ban-ssh rules then num will be 5 and fail2ban-ssh will be the section in which the rule is, -D is for deleting a iptable rule )
# iptables -A INPUT -p tcp -s XXX.XXX.XXX.XXX -j ACCEPT (will add a rule to accept all incoming connection from the IP)
# iptables -A OUTPUT -p tcp -d  XXX.XXX.XXX.XXX -j ACCEPT (will add a rule to accept all outgoing connection from the IP)

How to whitelist an IP in Fail2ban

Fail2ban uses iptables to block attackers, so if we want to add permanent IP address and never be blocked, we must add it in the config file.

First, edit the config file :
#vim /etc/fail2ban/jail.conf


Then, check the line :
ignoreip =
Add now add all ip you want. Each IP or range IP must be placed here with a space. Ex: 192.168.0.1 192.168.5.0/32
Save. And restart Fail2Ban:

service fail2ban restart

Sunday, September 2, 2018

Multi-Domain SSL Setup


SSL Setup for multiple domains/subdomains is different than single-domain or wildcard domain setup. There are 2-ways to setup this (as far as I know) – using Subject Alternative Names and Server Name Indication (SNI)
In this article, we will use “Subject Alternative Names” method.

Use Cases

This tutorial is intended for the following types of use case. If you are trying to setup something else, please ignore this.

non-www and www version of your site

  1. example.com
  2. www.example.com

wildcard (all subdomains) and apex/root/naked domain

  1. example.com
  2. *.example.com
Please note that most wildcard SSL does not protect your root domain i.e. example.com

altogether different domains

  1. example.com
  2. example.net
  3. google.com
  4. rtcamp.com
  5. www.example.com

Process

Different companies offer different type of SSL certificates. They have different type of interfaces for CSR signing and certificate generation. So we will outline process on your server-side only (which should remain common across all Ubuntu server)

OpenSSL Config File

Copy OpenSSL conf

By default, when you are are running OpenSSL commands, it is picking config from /etc/ssl/openssl.cnf file.
Unless you are configuring only one certificate on your server, it’s better to copy OpenSSL config file to website’s cert folder:
cp /etc/ssl/openssl.cnf /var/www/example.com/cert/example.com.cnf

Editing Config File

Open /var/www/example.com/cert/example.com.cnf
Look for  [ req ] section. Find add uncomment following line:
req_extensions = v3_req
If you don’t find a line like above, you can add one.
This will make sure our next section [ v3_req ] is read/used.
In [ v3_req ] section, add following line:
subjectAltName = @alt_names
It will look like:
[ v3_req ]

# Extensions to add to a certificate request

basicConstraints = CA:FALSE
keyUsage = nonRepudiation, digitalSignature, keyEncipherment
subjectAltName = @alt_names
Finally add a new section called [ alt_names ] towards end of file listing all domain variation you are planning to use.
[ alt_names ]
DNS.1 = www.example.com
DNS.2 = example.com
Note: I could n’t find out whether we need to add domain used in common-name field again here. So I added it again here. Now in common-field, we use www.example.com version – if SSL is for www and non-www versions of domains.
Now you have your OpenSSL config file ready.

OpenSSL Private Key & CSR

Make sure you are currently working in cert folder for your site:
cd /var/www/example.com/cert/

Private Key

Run following command to generate private key. Do not use passphrase as nginx will use this private key.
openssl genrsa -out example.com.key 2048

Certificate Signing Request – CSR generation

Next, we will generate CSR using private key above AND site-specific copy of OpenSSL config file.
openssl req -new -key example.com.key -out example.com.csr -config example.com.cnf
Please note -config switch. If you forget it, your CSR won’t include (Subject) Alternative (domain) Names.

Verify CSR

Since sending CSR and getting certificate is time consuming process, it’s better to verify if CSR is generated correctly.
Run following command:
openssl req -in example.com.csr -noout -text
You will see something like below in output. Please make sure you read highlighted area.
Certificate Request:
    Data:
        Version: 0 (0x0)
        Subject: C=IN, ST=MH, L=PUNE, O=RTCAMP SOLUTIONS PRIVATE LIMITED., CN=www.example.com/emailAddress=admin@example.com
 [...]
            X509v3 Basic Constraints: 
                CA:FALSE
            X509v3 Key Usage: 
                Digital Signature, Non Repudiation, Key Encipherment
            X509v3 Subject Alternative Name: 
                DNS:www.example.com, DNS:example.com
 [...]

Submitting CSR and Requesting certificate

Once you have CSR, the process of submitting it is online and often coupled with extra steps depending of certificate provider.

Wednesday, September 6, 2017

Migrate a MySQL Database To A New Server On Ubuntu

Introduction

If you are running a web application and database, say a LAMP stack, on a single VPS, you may run into a situation where you want to scale your environment to handle more traffic. A good way to get started with scaling your environment is by migrating your database server to another, separate VPS in the same datacenter.
In this guide, we will discuss how to migrate your existing MySQL database off of your application server. Because every application has its own configuration quirks, with regards to database connections and interactions, we will demonstrate the migration process with WordPress but you can adapt this guide to any other application that uses MySQL as its database.
Note: If you want to do an initial setup of your application with a separate database server, and therefore have no existing data to preserve, you should read the following linked tutorial instead of this one: How To Set Up a Remote Database to Optimize Site Performance with MySQL.

Prerequisites

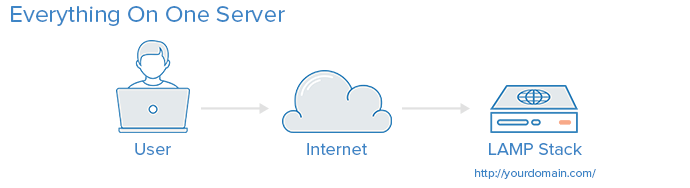
This tutorial assumes that you have some web application and database which reside on the same server, like in this diagram:

LAMP Stack

An example of this type of setup is: How To Install Wordpress on Ubuntu 14.04
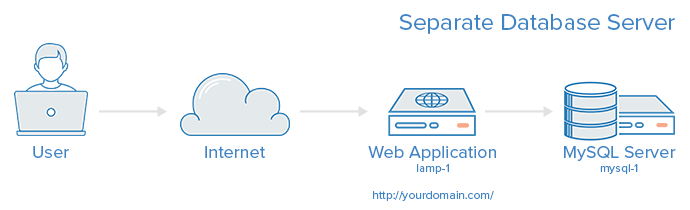
From now on, we will refer to your existing server as lamp-1.
You will need to create an additional VPS, with private networking, that will serve as your separate MySQL server. For reference purposes, we will call this server mysql-1.

Our Goal

When we are finished with this tutorial, we want to take our original lamp-1 server and migrate its database to a new server, mysql-1.

Separate Database Server

Tasks to Reach Our Goal

There are two main tasks that we need to complete to accomplish our goal:
  1. Migrate existing database to new server
  2. Reconfigure application to connect to new database
Let's get started on migrating the existing database!

Migrating Existing Database To New Server

Create New MySQL VPS

You will want to create the new VPS that will be your new MySQL database server--again, for reference purposes, we will call this server mysql-1. Create the new VPS now. If you do not have a standard setup that you do on your servers, you may want to follow steps 1-4 of this link: Initial Server Setup with Ubuntu 14.04

Install and Configure MySQL Server

After you have created your new database VPS, connect to it and install MySQL Server.
On mysql-1, update apt with the following command:
sudo apt-get update
Then run the following apt command to install MySQL Server:
sudo apt-get install mysql-server
Enter a root password for your MySQL installation (you can use the same password as your original MySQL server). Then run the following command create the default MySQL database tables:
sudo mysql_install_db
Next, run the following command to finish up the MySQL installation:
sudo mysql_secure_installation
You can respond "no" to resetting the root password (which you just set), and Yes to everything else.
Currently, your new MySQL database is configured to listen to localhost, or 127.0.0.1, only. We need to configure your database server to listen on its private IP address so your application server, lamp-1, can connect to it. Open your MySQL configuration for editing:
sudo vi /etc/mysql/my.cnf
Find the following line in your MySQL configuration file:
bind-address            = 127.0.0.1
Replace 127.0.0.1 with the your database server's private IP address:
bind-address            = mysql_1_private_IP
If you have any other MySQL configuration changes to make (such as non-default settings that were configured on your lamp-1 VPS), do it now then save and quit. To put these changes into effect, restart mysql with the following command:
sudo service mysql restart
Now your new server, mysql-1 is listening for MySQL traffic on its private IP address. Next, we will work on exporting your original database.

Export Backup Of Original Database

Optionally, you may stop your application server to prevent attempted updates to your existing database during the migration process. The database will be locked anyway, but it is something you may want to consider.
Next, we will want to export a backup of your original MySQL database, which will be used to migrate to our new database. We need to lock the database so we can do a data dump. Note: Locking your database will block updates to it, so your application will only be able to do read-only operations until you finish the rest of this tutorial.
On lamp-1, enter the MySQL console:
mysql -u root -p
To lock your database on lamp-1, run this from the MySQL console:
FLUSH TABLES WITH READ LOCK;
SET GLOBAL read_only = ON;
EXIT
Now, from your command shell, run the following command to export a backup of the databases on your original MySQL server to a file called dump.sql:
mysqldump --lock-all-tables -u root -p --all-databases > dump.sql
Copy your dump.sql file to your new database server, mysql-1, using scp:
scp dump.sql user@mysql_1_private_IP:/tmp
Since we are no longer going to use MySQL on your original server, we can leave it locked. If you want to unlock it, run the following commands in the MySQL Console:
SET GLOBAL read_only = OFF;
UNLOCK TABLES;

Import Original Database Into New Server

Now we will want to import your original database into mysql-1 so all of your existing data is preserved.
On mysql-1, run this command to import the dump.sql file:
mysql -u root -p < /tmp/dump.sql
At this point, all of your original database data and users have been copied over to your new database server, mysql-1. The next step is to create new database users that have the same privileges as the original ones.

Create Users To Allow Connections From Web Application Server

Because of the way that MySQL manages its users (they are identified as username and source host pairs), you will have to create new users with a "host" value that matches your application server's private IP address.
Enter the MySQL console:
mysql -u root -p
Enter the following statement to list all of the database users and hosts:
SELECT user,host FROM mysql.user;
Example Output:
+------------------+-----------+
| user             | host      |
+------------------+-----------+
| root             | 127.0.0.1 |
| root             | ::1       |
| debian-sys-maint | localhost |
| root             | localhost |
| wordpressuser    | localhost |
+------------------+-----------+
5 rows in set (0.00 sec)
In our example output, we see that there is a user called wordpressuser and its source host is localhost. Let's assume "wordpressuser" is our application user. Because the application and the database are now on separate servers, the application will no longer be connecting from "localhost". We need to create a new user called wordpressuser with its host value set to the private IP address of the application server lamp-1, to allow the application to connect.
Create a new user with the same name but change its host to the private IP address of your application server, lamp-1. Also, make sure your password matches the user's original password (substitute all the highlighted items with your own):
CREATE USER 'wordpressuser'@'lamp_1_private_IP' IDENTIFIED BY 'password';
For each user that you want to recreate, wordpressuser in our case, run the following statement to output its privileges (which we will need to assign in a moment):
SHOW GRANTS FOR wordpressuser@localhost;
Example Output:
User Privileges
Take a note of the line(s) after GRANT USAGE ON *.* because you will be using a modified version of it to grant privileges to the user you just created. For example, based on the grants of the original user, we will run the following statement to assign the same grants to our new user (wordpress is the database name, in this example). It is a copy of the output above, but localhost has been changed to our lamp-1's private IP address:
GRANT ALL PRIVILEGES ON `wordpress`.* TO 'wordpressuser'@'lamp_1_private_IP';
Now show the privileges for your new user:
SHOW GRANTS FOR wordpressuser@lamp_1_private_IP;
Example Output:User Privileges
After you are done updating the host values for the appropriate database users, run the following statements to put those changes into effect and exit the MySQL console:
FLUSH PRIVILEGES;
EXIT
Now that the new database server has been migrated and configured, you must update your application configuration to connect to your new database server!

Update Application Configuration

The last step is to update your application configuration to point to your new database server, mysql-1. That location of your configuration will vary depending on your application and where you installed it so we will use WordPress as an example.

WordPress Example Configuration

WordPress stores its database connection configuration in a file called wp-config.php in its installation directory (say /var/www/html/, for example).
Open WordPress configuration:
sudo vi /var/www/html/wp-config.php
Look for the following lines:
/** MySQL hostname */
define('DB_HOST', 'localhost');
Replace localhost with the private IP address of your new database server, mysql-1. It should look something like this (replace the highlighted):
define('DB_HOST', 'mysql_1_private_IP');
Save and quit. Now access your application how you normally do (lamp-1's public IP address or domain name). It should look exactly the same as it used to, but now it is connecting to the MySQL database on your new server, mysql-1!

Other Applications

If you are running a different application, simply update the application's database connection configuration to use the private IP address or name instead of "localhost" or "127.0.0.1". Depending on how your application handles its database connections, you may need to restart the application to connect to your new database.

Stop MySQL on Your Original Server

After you have confirmed that your application works fine with your new, separate database server, you will want to clean up your original MySQL database Server. Minimally, you will want to stop the MySQL service, so it stops using resources.
On lamp-1: run the following commands to stop MySQL and set it to NOT start on boot:
sudo service mysql stop
sudo sh -c "echo 'manual' > /etc/init/mysql.override"

Conclusion

Now that your database server has been separated from your application server, your environment should be able to handle more traffic because more resources are dedicated to each component. Also, your environment is now better prepared for other improvements such as load balancing and database replication.